Apr 30, 2018

The Little Red Shrine - Not!

This was a very unsatisfying tiny construction project. I cavalierly slogged on a wet coat of red ink, using it like stain, over all the pieces planned for this little red structure.

This was my first mistake, since the wet ink warped all the jumbo craft sticks, aka, my tiny lumber. Also, I made the tray for it to sit upon out of basswood, which absorbed the stain differently and dried much more red than the craft sticks, so I threw on some chalk paint to give the tray an antique look.

That was OK, but, I designed the structure much like the first tea room (modeled on the YouTube tutorial that taught me everything I know so far about constructing Japanese Tea Houses) with single walls supported by little square posts, which was not enough to make up for the fact that all the boards were warped. Time to advance to more grown up materials - in this case, basswood and balsa.


There is no roof for this structure, because in the middle if its difficult and wobbly construction, I realized it looked more like a bat and board barn from the 60s rather than a Japanese Tea House. Suddenly, the black dragons I imagined painted on the exterior walls didn't make sense any more.

I also learned the hard way that if you are planning to install interior wall coverings, you'd better do it before gluing the box together.

So, in the next post, we'll explore tiny double wall construction. Also a step up.
    

Apr 26, 2018

Making Stuff - Japanese Teahouse #8


These are not the final photos by any means, but this first Japanese Tea House is basically completed. There are a lot of things I will do differently for my next creations in the "Temples, Shrines & Tea Houses" project, but this is good for starters. Stay tuned for the next piece, The Red Shrine.


Apr 23, 2018

Apr 19, 2018

Making Stuff - Japanese Teahouse #6

To make this roof I used craft or popsicle sticks, large and jumbo. Even with a tiny miter box it is hard to make perfect cuts. Balsa is so soft it kind of crumbles on the ends. And Basswood needs a surprising amount of muscle.
As you can see by the pile of debris, tiny slices are the way to go. Carving tiny sticks to create joists takes patience, good motor skills and very sharp blades. It is also a testament to my hobby motto, "No Hurry."  Waiting for glue to dry is like watching grass grow. Or watching someone play golf. Soon I'll need two projects going at the same time to ease my frustration. Once my mind gets on an idea, the fingers become like little machines, ready to go - tiny tools, yee haw!

I altered the final roof line and materials. The tutorial called for a piece of fake leather to simulate the roof, but since my joins weren't exactly straight, I thought they might be hidden better with a wood rooftop.


The roof will not be glued down and will just sit on top of the structure, so if the mood strikes to make interior detail, it can be approached from above and not through the sliding doors. 


Apr 16, 2018

Making Stuff - Japanese Teahouse #5

 I found these tools while assembling my "Temples, Shrines & Teahouses" Kit. My husband David's father was a golf course architect, therefore collected these sets of marvelous tools. I don't even know what to do with most of the Xacto blades, still very sharp, but I love the set and the little blue box. And the carving tools on the right are overkill for Basswood and Balsa, but I love to look at them.

A regular Xacto blade will work for a carving tool when your medium is craft or popsicle sticks and Balsa wood so soft you could sculpt it with your fingernails.

Today I carved the pieces for the roof line. Each one has to be an absolute exact duplicate of the other or the roof will not fit squarely together. (The very accomplished artist's YouTube Tutorial I have watched about fifty times showed glueing the whole thing together with coffee stir sticks, but tiny trim board is more reliably straight.)


Apr 15, 2018

Making Stuff - Japanese Teahouse #4

 Wow! I forgot how wonderful and fun it is to have little Xacto saws and a tiny miter box to use on Basswood and Balsa. Thanks to David for hunting them down. Now the tiny architecture and carpentry can move up a notch.

After creating the doors I made little troughs in which they could slide and glued them to the corner posts. The fabric that started this whole project, the quilters' cotton pieces with excellent tiny Japanese designs, was cut to make a curtain for the back room. All this trouble and precision just to hang that little curtain.
I made a little rod out of a skewer, punched holes in the curtain top, slid it all together and glued the rod to two pieces of trim wood.

 Next I'll be working on the roof.

Each part of the structure has to be measured and cut along the way. It's too late now, but I should have stained the "wood," but I would be sure to screw up the shoji screens if I did it now. For my next teahouse, I might choose all the wood materials and stain them red before I begin.

Ha ha ha. Red. Of course!

 All of this is reminiscent of the Gingerbread Farm I built in 2011, according to no scale at all - just another one of those projects that started out as an idea and went berserk!

Here it is below in progress. Note the toasted and dyed green coconut for the lawn, the pile of marzipan pumpkins, the pretzel chicken house, pretzel wood pile. Pretty proud of those two little marzipan doggies and the flock of chicks, too. The red door  on the main house is marzipan, too.
um


Apr 11, 2018

Making Stuff - Japanese Tea House, Part 3

 I made these shoji screen doors entirely out of coffee stir sticks which cut easily with scissors. Instead of rice paper I covered the doors in muslin fabric.

Today I received a tiny Xacto miter box in the mail, as if by magic (thank you, David). While I await the tiny Xacto saw, expected on my doorstep Monday evening, I ponder and compare this experience to building Faerie Junction with my pals last spring.

First of all, my pals aren't here.

Secondly, our faerie scale was, "Whatever - just tiny. It's faeries."

Here, the measurements are a bit more precise. I want those corners perfect! I want those shoji screens to slide! Before I make my next cut (abashedly I admit to currently cutting with scissors and Xacto knives) I will have that little saw in my hand.

Next, I'll be making the sliders and  the roof. I want to put a tiny ceramic pot over a tea light for essentials oils. We'll see if the concept works. Stay tuned.


Apr 9, 2018

Making Stuff - A Japanese Tea House, Part 2

This tea house is built at 1/24 scale. I am precisely following a YouTube tutorial to get the scale and style firmly in my head before branching out into my own creations.

The platform (made from jumbo craft sticks) is approximately 8" x 8" and each tea house is four tatami mats, each 3"x6" in size. My tatami mats are made from tiny dowels and felt.

Next come the walls of the back room: craft sticks glued together with posts in the corners to form a little box, leaving an opening for a door. Next time I do this, I will put in tiny shelves before assembling the back room, and I've already got a couple of teeny tiny books somewhere in my stash.

The little door is calling out for a curtain - the first use of one of my fabrics with teeny tiny designs.


While the back room is drying, I started the six little shoji screen doors, which will slide on little tracks.


Apr 6, 2018

Making Stuff - A Miniature Japanese Teahouse, or two...


Every now and then I get a creative bee in my bonnet. It buzzes around in my hair telling me it's time to make something. Really, to build something. I'm always making something (knitting, cards, dinner) but this urge to build is different. It's a feeling in the solar plexis that will not relax until I see the buzzing idea through, or firmly make the decision not to do the project at all.

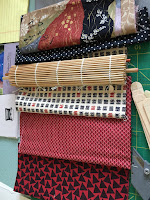
These Japanese Teahouses have been in my hair now for months, ever since I was given a few remnants of Japanese cotton with tiny designs.

I instantly saw teeny little curtains and a miniscule zafu pillow in a teahouse. From that moment, every time I saw the fabrics, they pulled me into their colors, bring me down into that tiny world, reminding me of Faerie Junction, that wonderful time and space my friends Lea and Jois and I spent in our collective minds while building the faerie village for Hanley Farm in April 2017.

A few days ago, those tiny fabrics practically yelled at me, like, "Dude! Let's do this!"

So I surrendered. I have assembled all the parts for several teahouses (of course - you thought I might just build ONE?). The first will actually be a lantern, with three simple sides and an opening for a tea light. Then, as I advance in my building skills, I'll attempt a  teahouse with an actual interior. If it works out, it will be an essential oil burner, with a tiny ceramic "caldron" in the middle.

Along the right side here are the various parts, in order:

-the fabric and a susi roller I thought might work as a tatami mat
-crafts sticks in the process of being trimmed with scissors
-a 1/24 scale graph
-a little store-bought platform
-skewers, tiny stones wrapped in wire and an umbrella
-the creation of the first platform
-cut craft stick tips (they curled up in the cutting -
they might make good roof shingles)
-and the laid out platform waiting to be glued.

This is all very well and good, but anyone who has followed this blog will ask, "What? I thought you put all your three dimensional projects away in honor of knitting and Studio in a Basket!" So, right. This post is to say, "I surrender."

It's danged uncomfortable to stuff one's creativity down. Don't do it. The spirit of creativity has a way of getting under the skin. In my case, it's a muse I sometimes call Patricia, who dances down the hall and drags me to see moonshine, shadows, light. She sent pictures of teahouses through Facebook, brought into my fingers old books of Japanese designs collecting dust on shelves.

Before I knew it, all this paraphernalia was assembled on my workbench (I only spent $36) and I had three sets of Japanese teahouse plans in a folder on my desktop.

Stay tuned for the next installment of "Making Stuff - A Miniature Japanese Teahouse.


Apr 2, 2018

eBOOKS!!!

Thanks to the Lucky Valley Press tech department, First You Grow the Pumpkin, 100 cool things to make and preserve, my best cookbook, filled with all my favorite concoctions and kitchen creations, is available as an eBook.

First You Grow the Pumpkin was inspired by my brother Jess, who posed the question, "Why is it, when asked for a recipe, your first response is, 'Well, first you grown the______?'"

The DIY trend is nothing new for me. I have been churning butter, growing herbs, making stock and creating food from scratch since knee high to my mother on my grandfather's farm in Ohio.

On the left is an abundant harvest from Seabreeze Farm in San Diego. On the right, one of my mother's water colors from First You Grow the Pumpkin. She called it "Chicks." I call it "Run for Your Lives."

Other new eBooks from Lucky Valley Press

The Lavandula Series,

As the Wheel of Life turns at Sweet Farm, the homestead of the Wymans, a Carmel Valley, Calfornia family, we focus on three sisters: Rita, Nana and Fox, and their three daughters: Tate, Stevie and Jolene, cousins and friends.

In the Lavandula Series, life rumbles the earth at the farm, like any compound full of women, their men, children, elders and friends. They breathe the air of the Valley, filled with the scent of lavender growing abundantly on ten fertile acres. They eat of the garden harvest. The women are restless. The men are nervous.

The girls are growing up in the 60s and they and their peers will become known as Baby Boomers, Flower Children, Hippies, Yuppies, the ME generation; they will be affected by the Vietnam War, Rock & Roll, revolutions from sexual to political and other dramatic social changes.

But, mostly, they will be dealing with their loves, their children and their homes as they relate to and are touched by those concerns mentioned above.

Look for Stefani's Peacock Feather!